Note: The images in this document are cropped from real screen shots of a demo site showing the area of the screen that is being discussed.

Table of Contents

    1. General Information – Contains basic information about setting up and using your Member Manager website.

      • How to use Member Manager
      • Usernames, Passwords and Logging In
      • Browsers
      • Email being marked as Spam
      • Setting up your Member Manager Site
      • What is new in this Release.


  • Member Manager Applications – The Applications/Functions most often used by members. (You may, or may not, see all of these menu items depending on how your organization is using Member Manager.)

  • Welcome – View Welcome Page
  • Getting Started – Tutorials to help you get started
  • My Information – Takes you to your Page – A good way to get started.
  • Members – Look up member information
  • Calendar – View Events on the Calendar
  • Event Fees – Members can register and pay online to attend Events
  • Dues – Members can pay Membership Dues online
  • Email – Send an email to groups, families, officers and/or members
  • Folders – Access Folders and Files in the file storage area
  • Forums – Access Forum Topics (Discussion Threads)
  • Galleries – View Photo Galleries
  • Groups – Specify Groups, Committees, Families and Roles (and Dues)
  • Help– Access the Help/User’s Guide
  • Money Manager – Enables the Treasurer to manage organization finances
  • Reports – Display and print custom and standard reports
  • Roles – See Groups above,
  • Signup – Allow non-members to apply to join your organization
  • Surveys – Provide Survey and Election capabilities to the members of your organization.
  • Tell a Friend – An easy way to tell friends, via a prepared email, about Member Manager for their organizations.

  • Site Setup – Setup options, i.e. options that change how the site looks or works

    • Features and Payment – Picking features and on paying for your site
    • Custom Data Fields – Create/delete custom data fields
    • Dues Management – Setting up and managing member dues payments
    • Manage Member Photos – An appication to aid a larger organization in managing member photos
    • Ordering Fields – Change field order when viewing a nember
    • Website Pages – Create and edit simple web pages
    • Upload Member Data – Bulk upload of member data
  • Other topics of interest

      • Have Member Manager be your Main Website
      • Finding your Site & Domain Forwarding
      • FAQs
      • Contact Us


Return to the Table of Contents

Edit My Info

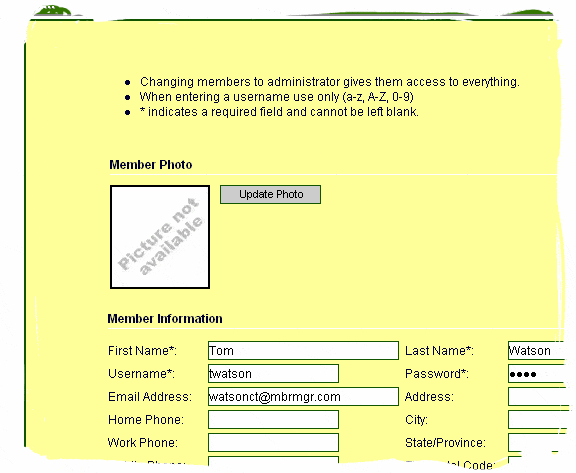
When you click on Edit My Info (in the menu bar inside Members), a screen opens up that permits you to change any of the values in your member record including, for instance, your Username and/or Password.

The field names with an asterisk (*) are required fields.

To update your data, modify the fields you wish to change, verify all required fields are complete and then click on the Submit button in the bar at the top of the screen.

If the Additional Information field is present, you can use the text editor to enter information there. Your organization should have explained what kind of information it wants to see in the Additional Information field. In many cases, it may be your resume’ or for a car club, for instance, it might be a description of your vehicle.

Note: If we have not included your country in our drop down list, use the email link at the bottom of the screen to notify us and we will add it.

Updating your Photo

If the Picture Not Available image is shown, no picture has been uploaded for that member. If there is no place for a photo, then the Member Photo Features is not turned on (see Managing Features to turn on the Member Photo Feature).

To upload your photo, select Update Photo and then click on the Browse button and navigate to the place where you have stored the photo you want to use. Your club has selected the size of photos it wants in your site. If your photo is smaller, it is uploaded as-is. Photos larger will be automatically to the height specified by your club. For best results, crop and/or resize the photo before uploading. Using any Photo Editor, crop the photo to make the face as big as possible and then resize it to the height specified by your club.

Once you click on Open and then Submit, anyone viewing your member data will see your picture.

Return to the Table of Contents

Members

Members is the function used by any member to look up individual member information. It is also used by Administrators to create, edit and delete members. New member data changes are immediately available whenever member data is changed.

Members usually see the screen below, but if they have a Role that allows them to “Manage Members” then they see the screen under Members.

Selecting View Members opens up a powerful member roster in alphabetical order with enough key information so that you may not even need to use the View button to find what they need to find (phone or email address).

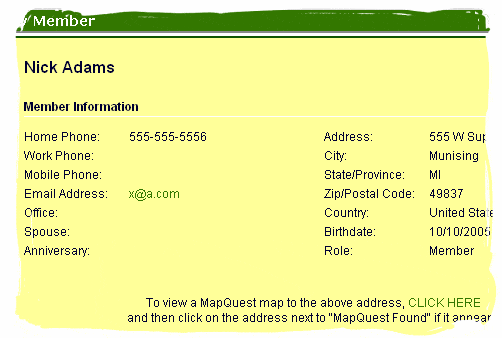
Clicking on the email address of a member opens up an email to that member. Pressing the View button displays the member’s information page (as shown below).

For organizations with enough members that the member is not shown on the first page, you can click on the page numbers at the bottom of the screen to see additional pages of members.

To use our powerful search options, you:

  • Click on the letter (or [all]) in the Alphabetical Search to list all members from that letter onwards, or
  • Type the first part of the last name into the Detailed Search “partial name” field and click on the Search button.

To have members be ordered by first name instead of last name, select it before using either of the search options above. To return the whole list sorted by first name, select First Name and then either click on [all] option or type the letter a into the partial name search field and click on the Search button.

Clicking on the view button, returns the Member Information screen for that member.

When the member’s address is filled in, a Click Here link (shown above) appears at the bottom of the View Member screen which, if clicked, generates a MapQuest map to the member’s address.

If the Member Photo Feature is enabled, and a photo has been uploaded, the photo of the member will appear next to the Name.

If enabled, the Additional Information field provides a large prose area. For Professional Organizations, it can be for a “resume” type document. For car or motorcycle clubs, it could be the description of the member’s vehicle. (To enable the Additional Information field for the entire organization, the administrator goes to the Reorder Member Form option under Site Customization and sets the Additional Information field so that it will be displayed. It is the last field shown.)

Return to the Table of Contents

Manage Members

The “Manage Members” authority in a Role allows a member with that Role to add, view, edit or delete any member. When this member clicks on Members under Applications they see the screen below.

To Add Members, click the + Add Member button on the right of the lower Menu Bar.

To view, edit or delete a member, first use the search function to quickly find the member. To search for a member, you have three options:

  • Click on the letter, in the Alphabetical Search, to find all last names starting with that letter, or
  • Type the first part of the last name into the Detailed Search field and click on the Search button, or
  • Scroll down to the bottom of the window and use the page numbers to find the page with the name you want.

Once you find the member you want, there are three buttons allowing the Administrator to View the member’s information, Edit the member’s information or Delete the member.

  • The View button opens up View Member.
  • The Edit button opens up a window similar to Edit My Info.
  • Clicking on the Delete button deletes the member. Warning: This delete is irreversible.

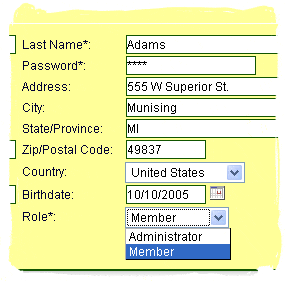
Warning: An Administrator selecting Edit or Edit My Info sees an additional field called Role which here has only two values: Administrator and Member. A member’s role determines the things that that member can do and see in the website. See Roles for more information before making anyone an Administrator.

For an administrator to change to using different role, another administrator must be first created and the change must be made while signed on as that administrator.

Uploading a Member’s Photo

See Edit My Info for information on how to upload a photo for a member. You might want to have a person be your organization’s photographer and that person would have Manage Members capability to manage each member’s photo.

Return to the Table of Contents

Adding Members

The Add Member function is used by the Administrator to quickly add new members and is accessed by clicking on the + Add Member button in the upper right of the Manage Members screen. The only fields that “have” to be filled in are the First Name, Last Name, User Name and Password.

When a member is added, and if the email field is filled in, a prepared email is available to be sent to the member that explains how to sign on. The administrator adding the user can personalize the email before it is sent. The administrator may also permanently change the new member email for thier organization so that there is less personalization needed for the next new member.

When adding members that do not have computers, you may leave the email address blank.

If you are maintaining active and inactive members on your site, consider adding a custom field “Status” so that you can create reports and filter out or sort by “active” vs. “inactive”, etc.

Return to the Table of Contents

Advanced Search

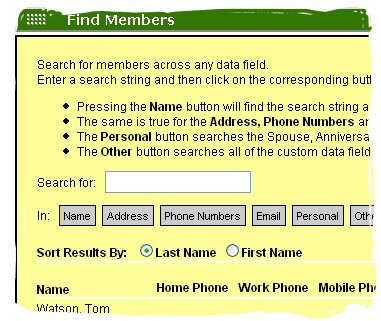
The Advanced Search function is used to quickly find members from any snippet of their information and is found in the menubar after selecting Members.

For instance if you remember that the person’s name ended with “son” then putting that in the search field and clicking on the Name button will return all people with “son” in their first or last name. If you remember that the person was in a 213 area code, Find Member will return those by pressing the Phone Numbers button.

The “Personal Info” button searches Birthdate, Anniversary and Spouse. The “Other” field searches any of your organization’s “custom fields”.

Return to the Table of Contents

Offices

Selecting Office brings up a screen very similar to the corresponding Members screen except it shows the office on the left and is sorted by the office name.

If the is an Administrator or has Manage Offices authority through a Role, then that member can customize the offices to match the organization’s needs. A set of default offices are automatically created when the site is created. The Administrator can delete all the offices that do not apply to that organization and add ones that are more applicable.

To add an office, click on the + Add Office button in the upper right of the window.

Once the Offices are added, members can be assigned to the offices by the Administrator either through this screen or via the Manage Members screen.

An office is different from a Group in that a member can have only one Office while a member can be a member of multiple Groups. Several members can hold the same Office but a member can only be assigned to one Office.

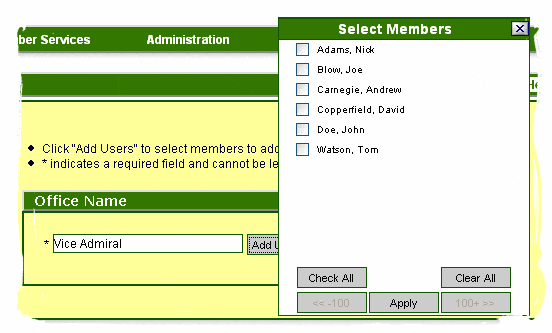
When you select +Add Office and then Add Users the member selection table pops up. Select the member(s) you want to hold the office, click on Apply and then click on Submit and the members are assigned to the Office.

Return to the Table of Contents


Email Members

To send an email to members, select the Email Members function from the menu. A blank email will open up with your email address automatically set into the From: field. Your email address is also automatically set into the CC: field to give you a copy of the email sent. If you use CC: to select names, remember to re-add your email address to receive a copy.

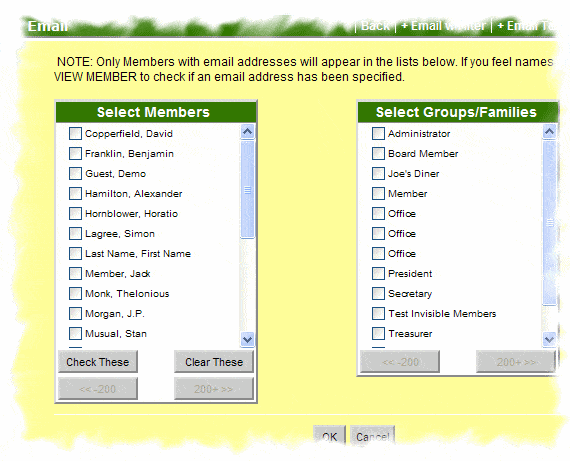
Click the To:, Cc: or Bcc: (blind copy) buttons to select the members from the Select Member(s) list. You can also send the email to an entire group by using Select by Group or to specific officers by using Select by Office. As you select groups or offices, the corresponding member names are checked in the Select Member(s) List.

Selecting Select All or Clear All will set or clear all the check marks.


When the Select Member(s) list is correct, click on the OK button below the selection tables to return to the Email body where the To:, Cc: or Bcc: fields contain the selected members.

Next you type the subject for your email in the Subject line, attach any attachments you want to include and type the body of your email in the Text Editor window. Note all the formatting options that are available to you.

When you are all done, click on the Send Email button at the bottom of the email body window to send the email.

Sending an email to large number of recipients may cause the email to be treated as a Spam email by some Spam filters. Under the To: line, you have an option of sending one email containing all the addressees (the default) or to click on the second radio button and enter the maximum number of address you want for each email (set to 10 in the example below). Specifying a number causes Member Manager to break the email up into several emails with the specified number of To: addresses in each email. The Cc: and Bcc: addresses are not broken up and are sent in the first email only.

Return to the Table of Contents

Calendar

Select the Calendar option to view the calendar, view events, add an event and/or register for an event.

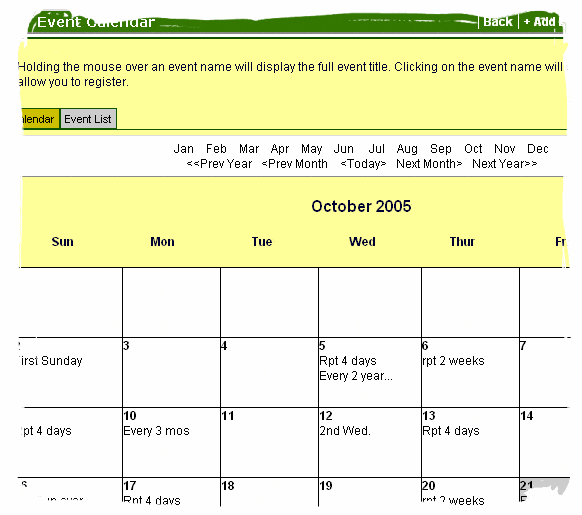
The hyperlinks above the calendar (i.e. Jan Feb Mar and <<Prev Year <Prev Month) allow you to navigate quickly and easily around the calendar.

Select the Event List tab to view the events for that month in a list format rather than the graphical format. To print a Event List for the current month, use the Calendar Report button at the upper right of the window.

Events are represented by the Event Title in the date box. The title wraps if it is too long. To see what the event is, hold the mouse over the title and the title for that event will appear. Clicking on an event brings up the description of the event.

The display order within the box for one day are ordered by the Start Times.

If within the registration period, you can register to attend the event by clicking on Register Now. Depending on the event definition and your role, other buttons will also appear, for example Attendee Report, etc. Another button you may see is an Add Registerants button which provides a way to add registrations for people who cannot do it themselves (non-computer users, guests, etc.).

If the event’s address was filled in, you can also view and/or print a map showing the location specified in the event.


To register for the event, click on the Register Now button and enter the number of attendees. If your organization has enabled the Dues/Fees Feature the event may have fees associated with it. There may be several items you can specify a number for or leave zero, for instance:

Guests $25
Members $20
Fish $0
Beef $0
Chicken $0

If Start Registration and End Registration date were specified, and if within that period, the Register Now button will be shown. For this event, you can key 2 in Members and 2 in Guests and then specify 2 Fish, 1 Beef and 1 Chicken so that everyone has their own meal choice.When you click on Register, you will be led through screens to pay for the event registration online via credit card or if you do not want to pay online, you can check the box that says “I’ll pay offline by paying the Treasurer directly.”.

Members can add events to the Calendar by clicking on the  + Add Event button in the upper right of the window. A member can edit or delete events through Edit Events button. The creator of the event is identified in the event. Only the creator of an event or an Administrator can edit or delete an event (using Manage Events). Only an Administrator can edit or delete events created by an Administrator.

Return to the Table of Contents

Manage Calendar Events

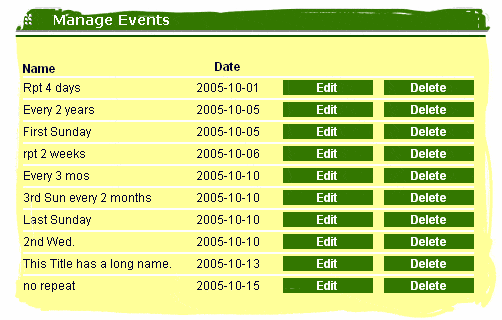
Manage Events is the option you use to Edit, Delete and Add Events. Only the creator of the event or an Administrator or can edit or delete an event.  Beware, deletions are irreversible.

  • To edit an event, click on the Edit button in front of the event, modify the fields you wish to change and click on the Submit button.
  • To delete an event, click on the Delete button in front of the event.
  • To add an event, click on the + Add Event button in the upper right corner.

Return to the Table of Contents

Add Event

To Add an Event to the calendar, you click on the + Add Event button either while viewing the Calendar or when in Manage Events.

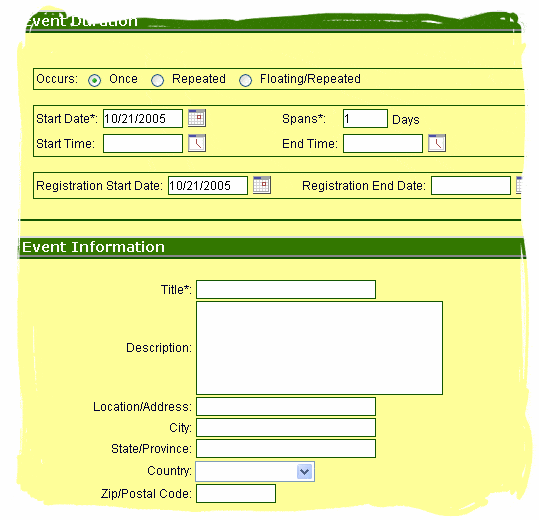
The only required fields are the Event Title and the Date. However, you can add

  • Start and End Times
  • Whether the event occurs once or is a repeating event
  • Span Dates – whether the event lasts several days
  • Registration Period – Start and End Dates
    and/or a maximum number of reservations
  • Description – using the Text Editor
  • Location – which then enables the map capability
  • Whether the Event is viewable on a Calendar before logging in, after logging in or both.
  • Whether any Roles besides the event creator or an administrator can view the Registration Report.
  • Event Fees – if applicable and if the Dues/Fees Feature is enabled.

Notice the Calendar and Clock icons next to the date and time fields. These are “Date/Time Pickers”. Click on them to easily select a date or time. If you wish to enter a date by hand, it must be typed as mm/dd/yyyy which means 03/05/2005 and not 3/5/2005 or 03/05/05.

If a valid location is entered, the Map button will appear when the event is displayed and, when pressed, will display a map to the Event location.

The creator of an event is identified in the event. Changes to an event or deletion of the event are performed using Manage Events by either the creator of the event or by an Administrator .

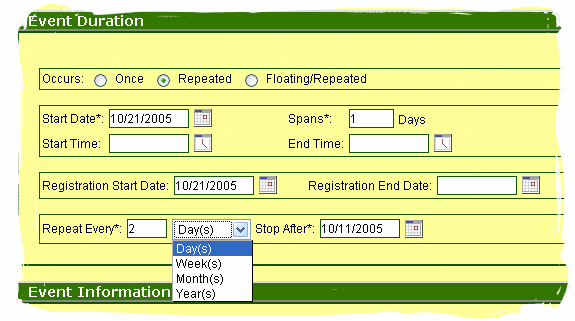
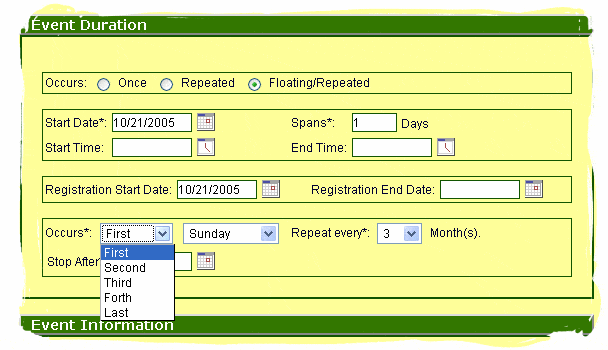
Member Manager also supports two types or recurring events.

Repeating Events allow you to specify that an event will occur every 2 days or every 3 weeks or every 4 months. You also are required to specify a Stop After date to stop the recurrences.

Floating/Repeated events happen on the same relative day each month, like the 1st Monday of each month or the Last Friday of each 3rd month.

If the Dues and Event Fees Member Manager feature (see Features & Payment) has been enabled, the creator of the event may associate fees with registering for the event. For example in the event below, the Dinner costs $35 for members and $45 for guests. If you are bringing your spouse/significant other and another non-member couple, you would register for 1 Member and 3 Guests. You can also use $0.00 fees for other things like the Entree choice, for instance 2 Beef and 2 Fish for the two couples.

When the member registers for an event with fees, the registration screen appears. In the example above, that member would register for 1 Member, 3 Guests, 2 Beef and 2 Fish.

When you click on the Purchase button, a payment screen appears. The payment can be made online using a major credit card and goes directly into the organization’s account. If the member does not want to pay online, the member can check a box saying that he/she will pay the Treasurer directly, via mail for instance. In either case, emails are sent to both the person registering and to the email address specified in setting up the Dues and Event Fees feature (usually the Treasurer) to document the registration and payment.

Return to the Table of Contents

Welcome Page

When you first log in or when you select WELCOME, you are presented the Welcome Page.

The Welcome page is a place where you can put up-to-date messages to your members like:

       “Don’t forget to attend the big fund-raising Auction, Friday night, 9 pm.”

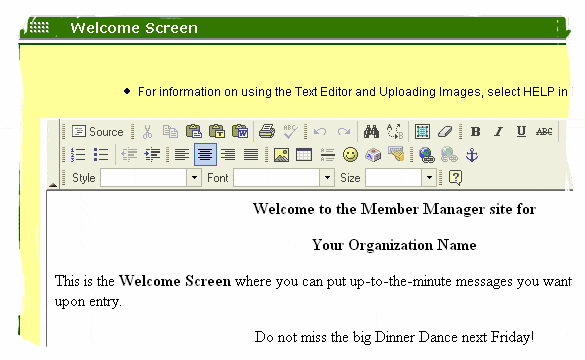
The Welcome page is very easy for the Administrator to modify. When on the Welcome Page, the Edit Welcome Page option on the menubar opens the editor that is shown below. It uses a web-based text processor very similar to what you use on your computer now, so it should be very easy to use.

It has fonts, sizes, bold, italics, underline, left, right, center and justified paragraphs, etc. If you hold the cursor over one of the buttons, a label will pop up saying what it does.

Just click on the Submit button when done editing to see the resulting page.

Using the Text Editor

To create the HTML content for your page, you use the same text editor that Member Manager uses for other functions. You type in your content, formatted the way you want, just as you would in any word processor. After clicking on Submit, you can see what the page looks like without having to log out and go look. Note that your organization’s default “Main Body Background” color and “Main Body Text” color (from the Site Settings screen) will replace the white background and black text color unless you actually set them to something else. If you want something else, set the “Style”, “Font” and “Size” for your text.

As you probably already know, pressing ENTER creates a 2 line carriage return. If you want to have typing on the next line, use Shift-ENTER (as with most word processors).

If you already know how to create websites and write hypertext, you can use the text editor’s Source button to get at the HTML code. You could also paste hypertext into the window from another web editor (the width of the available area is 700 pixels). If you paste formatted text from Word, use the “Word Paste” button in the upper row.

Here are some tips on using the text editor to format web pages in Member Manager:

    • If you make a mistake, use Undo. Once you press Submit, the changes cannot be undone.
    • If you are in a position where Undo or Redo won’t help, do not press Submit, but instead, re-open the Web Page for editing and you will be back to the last saved version.
    • In general, formatting will be easier if you start with a blank page than it is if you paste in existing HTML from another page and then try to edit it. If you do paste in content from another page and are having trouble, use the Select All button and then (next to it) the Remove Format button which removes all formatting but leaves the content.
    • If you know HTML, you can directly edit the HTML code by clicking on the Source button (and click on it again to come back to the normal view).
    • If you do not know HTML, it is best to start with a blank page and just type in what you want, where you want it. Format the text just like you would format text in a program like Word.
    • Making your website pages be the same as all the other Member Manager pages.
      • Text not inside a table – If you do not specify any formatting, the font color, size and background will be the same as in other Member Manager pages.There are two text styles Body Text which is the Member Manager default and Body Text Lg which is the bigger one used in Member Manager. You can highlight the text and use either of these styles or you can use the font, size and color options to make it whatever you want.
      • Links – To make the links on your pages be the same as on our pages, do the following:
        • Type the text you want on the user to click on, i.e. “Click Here”, “Main Website”, etc.
        • Then highlight that text with your mouse
        • Then select the editor icon that is a globe with a chain link
        • Specify the link, i.e. www.membermanager.net, etc.
        • Press Enter.
        • Immediately, while the link is still highlighted, select the Style Body Link.
        • Done. After submitting the page, the link will look just like one of ours.
      • Text inside a table – Tables, by default, have a grey text after Submitting the page. To fix this:
        • Highlight all of the text inside one cell and then select the Style Body Text or Body Text Lg
        • You have to do each cell individually.
        • When you submit the page, the text in the table will be the same as on our pages.
      • Or, you can:
        • Click on the Source to switch into Source Code View
        • Find the start of the table <table …>
        • Find the “<tbody>” after the <table …> statement and make it <tbody class=’bodytext’>
        • Press the Source button to return to the normal view

Inserting Images – For information on Inserting Images into your Welcome Page, click here.

For information on editing Member Manager website pages, see Website Pages.

Return to the Table of Contents


Log Out

Although you can close the Browser at any time to end Member Manager, the Log Out option closes your session and takes you back to the Log In screen.

Return to the Table of Contents

Help

The Help option under Applications takes you to this Help Guide from any Member Manager site. The Help button on the right side of the menubar is “context sensitive” which means it takes you directly to the Help text for the option you are using.

Return to the Table of Contents

Features & Payment

Features & Payment is the menu option you use to add/remove services to/from your Member Manager subscription and how you pay when it is time to renew your subscription.

To add services, you merely check the box(s), press Update Services and then Submit Feature Changes. Then you can test and use the service until your scheduled renewal date. At the renewal date, use the Purchase button to start the purchase process for the currently checked features.

Return to the Table of Contents

Getting Started

Clicking on any of the following options displays a tutorial script that you can print. The Tutorials will guide a new user through the functions available to them in their Member Manager Site.

  • Members – Getting Started with Member Manager for Members (Regular Users).
  • Administrators – Getting Started with Member Manager for Administrators
    (Members that set up the site – usually the Organization’s Secretary. You will know if you are an administrator.)

    • Getting Started with Customization – Setting up the look and feel
    • Getting Started with Sign Up – Enabling the Signup feature
    • Getting Started with Groups – Making Committees, Families, Teams
    • Getting Started with Reports – Creating and controlling Reports
    • Getting Started with Photo Galleries – Documenting fun events
    • Getting Started with Folders – Making organization files available online
    • Getting Started with Dues and Fees – Online dues and fees payment
    • Getting Started with Forums – Enabling Member Discussion Forums
    • Getting Started with Money Manager – Manage your Finances

Return to the Table of Contents

FAQs and Setup Tips

FAQ #001 – How to print name badges or other items.
FAQ #002 – Getting to the Member Manager Login
FAQ #003 – Inserting Images


FAQ #001 – How to print name badges.

The Export Report button downloads a .txt file (tab-delimited-file) named mbrmgrdata.txt. A tab-delimited-file is the basic format used by all spreadsheets and mail merges.

Mail merge is a Word Processor function where a form letter is merged with a “data” file (many times a tab-delimited file with rows of names and addresses). The values in each row of the data file are merged with the form letter to become one word document page. This is how form letters and envelopes are printed. See your Word Processor for instructions on Mail Merge.

Note:

  • You have to create a download report with the fields you need for the merge (Firstname, Lastname to print Name Tags for example).
  • Then use Export Report to download the report to your Desktop.
  • Create your Mail Merge document in your Word Processor.
  • Depending on your Word Processor, the merge should work directly from the tab-delimited file. In some cases, you may need to import the tab-delimited file into the spreadsheet application and save it as a real spreadsheet before it will work with Mail Merge.

The Export Report button downloads a tab-delimited file named mbrmgrdata.txt. A tab-delimited file is the basic format used by all spreadsheets

Return to the Table of Contents

FAQ #002 – Getting to the Member Manager Login

There are two ways to ease getting to your Member Manager Site – 1) Putting a Shortcut on your desktop or 2) Setting a Favorite/Bookmark in your browser. Both are explained below.

1) Storing a Shortcut (Icon or link) on your desktop

  • When at the Member Manager Login screen, right-click on the icon at the left of the browser Address: bar and select Copy from the dropdown list.
  • Go to your desktop and in an open area, right-click and select Paste Shortcut.
  • Right-click on the new shortcut and use Rename to name it with a name meaningful to you.

2a) Saving a Favorite (Internet Explorer)

  • Click on Favorites on the File Edit View line of Internet Explorer.
  • Click on Add to Favorites…
  • Give it a name you can remember.

2b) Saving a Bookmark (Firefox/Netscape/Mozilla)

  • Click on Bookmarks on the File Edit View line of your browser.
  • Click on Bookmark this Page…
  • Give it a name you can remember.

Return to the Table of Contents

FAQ #003 – Inserting Images

Inserting Images has moved. Click here.

Return to the Table of Contents

How To Contact Us

By Phone: 888-747-3651

By Mail:

Member Manager, LLC.
1221 Ananda Place, NE
Bainbridge Island, WA 98110

By Email: Support@membermanager.net